The painful truth is that high-end studio gear often makes your sound worse by acting like a magnifying glass, brutally exposing every hidden flaw in your recording chain.
- The single biggest bottleneck is almost always your room’s acoustics, not your equipment.
- Achieving professional sound is about system balancing, where every component works in harmony, rather than owning one expensive « hero » piece of gear.
Recommendation: Before buying another piece of equipment, perform a full system audit starting with your room’s acoustic treatment—it’s the highest impact upgrade you can make per pound spent.
You’ve done the research, saved up, and finally pulled the trigger on that gleaming £800 preamp or £1,200 microphone. You unbox it with reverence, plug it in, and hit record, anticipating a sonic revelation. Instead, what comes back through the speakers is… disappointing. It might even sound harsher, thinner, or just plain worse than before. Meanwhile, your friend is producing impressively solid tracks with a modest setup that cost less than your new preamp. It’s a uniquely frustrating experience for any musician serious about their craft.
The common advice echoes in your head: « buy the best you can afford, » or the unhelpful classic, « it’s the ear, not the gear. » But you did buy the best, and your ears are telling you something is fundamentally wrong. The problem isn’t that you’ve been scammed or that your new gear is faulty. The issue is that nobody tells you the most important secret of studio building: a high-end piece of equipment doesn’t magically lift everything up. Instead, it acts as a powerful magnifying glass.
This article is for the UK musician who has invested in their passion and feels let down by the results. We’re going to bust the myths that lead to expensive mistakes. Forget the idea of a single « magic bullet » upgrade. We will dissect your recording chain piece by piece to understand a far more powerful concept: system balancing. You will learn not just *what* to upgrade, but *why* and *when*, transforming your studio from a collection of expensive parts into a cohesive, great-sounding whole.
To get to the bottom of this common but painful studio problem, we will break down the key areas where potential is lost and money is wasted. This guide provides a clear path to identifying your system’s true weaknesses and making smart, high-impact investments.
Summary: Why Your Expensive Studio Gear Might Be Failing You
- Why Did Your New £800 Preamp Make Your Recordings Sound Worse?
- How to Identify Which Single Upgrade Will Transform Your Sound Most Per Pound Spent?
- New Focusrite or Vintage Neve: Which £400 Spend Gets Better Results?
- The Gear Pairing That Wastes 70% of Your Equipment’s Potential
- When in the Year Should You Buy Studio Gear to Get 30% Better Deals?
- When Should You Buy Vintage Gear for Best Value in the UK Market?
- Which Interface Features Should You Buy for Today Versus Future Needs?
- Why Does Your Recording Sound Different When You Change Audio Interfaces?
Why Did Your New £800 Preamp Make Your Recordings Sound Worse?
The most likely reason your expensive new preamp is making your recordings sound worse is what I call the « magnifying glass effect. » A high-quality, transparent preamp like a Grace Design or a high-end interface doesn’t add much colour of its own. Its job is to faithfully amplify the signal it receives. When you replace a budget preamp that was smoothing over or masking imperfections, the new, high-fidelity unit mercilessly reveals the flaws in everything else: the cheap microphone, the poor-quality cable, the untreated room’s reflections, and even the hum from your computer.
This isn’t a failure of the preamp; it’s a success. It’s doing its job so well that it’s exposing the true « weakest link » in your chain. Another critical, but often overlooked, factor is impedance mismatch. This electrical relationship between a microphone and a preamp can dramatically alter the tone. A vintage-style ribbon microphone, for example, might sound thin and lifeless when plugged into a preamp with the wrong input impedance, regardless of how expensive that preamp is. As one expert forum discussion concludes, a recording chain needs to be judged as a complete system.
The interaction between microphone and preamp is of utmost importance. It is not known which specification exactly translates to a better sound for our ears and needs, and a recording chain needs to be judged as a system.
– Gearspace forum expert discussion, What’s the cleanest, most transparent VOCAL mic pre that money can buy?
This concept of synergy is vital. The preamp isn’t just an amplifier; it’s a partner to the microphone. The illustration below shows the critical contact points where these electrical signals meet, a junction where sonic character is defined or destroyed.
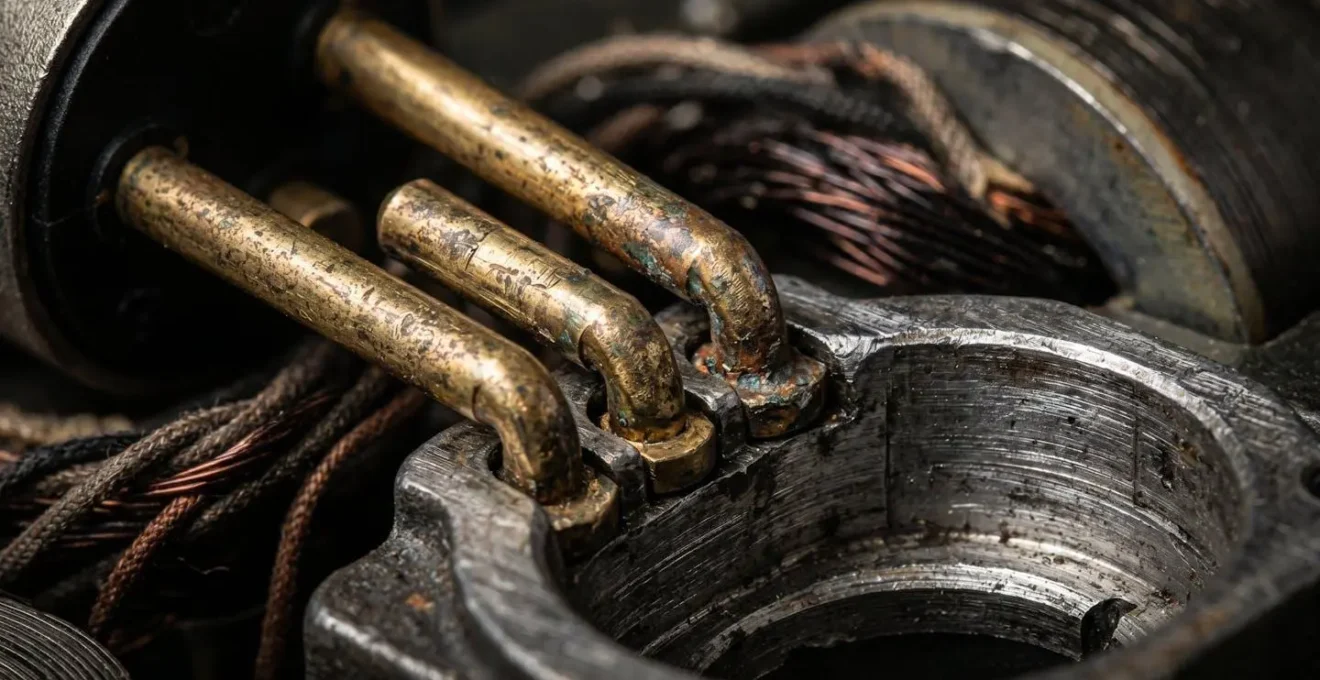
Seeing these components in detail highlights that we are dealing with a sensitive electro-mechanical system. Your £800 investment didn’t fail; it just gave you an honest, and perhaps brutal, diagnosis of your entire setup. The solution isn’t to get rid of the great preamp, but to start upgrading the other parts of the chain to match its quality.
How to Identify Which Single Upgrade Will Transform Your Sound Most Per Pound Spent?
For 99% of home studios, the answer is unequivocally: acoustic treatment. Before you even think about another microphone, compressor, or plugin, you must address your room. You can’t out-spend bad acoustics. Pouring money into high-end monitors or microphones in an untreated room is like buying a Ferrari to drive through a swamp. You’re paying a premium just to hear how bad your environment sounds in high definition. This is your studio’s « acoustic debt, » and it must be paid off first.
The good news is that tackling this offers the highest return on pound spent of any studio investment. You don’t need to hire an acoustician or spend thousands. In fact, DIY acoustic panels can provide professional results for under £500, a fraction of the cost of a high-end preamp. The key is to apply treatment strategically, focusing on the most problematic areas first. The most critical zones are the « first reflection points » on the walls to your sides, the ceiling above your mix position, and the wall behind your speakers. Equally important are the corners, where low-frequency energy builds up and creates a muddy, inaccurate bass response.
By investing in a few well-placed bass traps and absorption panels, you remove the room’s negative influence from your recordings and your monitoring. Suddenly, your existing gear will sound dramatically better. Your mixes will translate more accurately to other systems, and your recordings will be cleaner and more defined. This is the single most transformative upgrade you can make.
Your Acoustic Treatment Priority Plan
- Treat first reflection points: Place acoustic panels on side walls, the ceiling, and the rear wall as your top priority to tame early reflections.
- Install bass traps: Position panels at least 4 inches thick in floor-to-ceiling corners to gain maximum control over the low-end.
- Use an incremental approach: Add treatment gradually, testing with your ears and reference tracks after each phase to avoid over-damping the room.
- Target soffit corners: For extra low-frequency control without sacrificing floor space, consider adding treatment to the corners where walls meet the ceiling.
- Test and adjust: After each installation, critically listen and compare. Your ears are the final judge before adding more treatment.
New Focusrite or Vintage Neve: Which £400 Spend Gets Better Results?
This question gets to the heart of the « clean vs. colour » or « modern vs. vintage » debate. A vintage Neve preamp is legendary for a reason—its transformers add weight, warmth, and can be driven into a harmonically rich saturation. For a specific sound, it’s incredible. However, a single channel of genuine vintage Neve costs thousands, and even a good clone is well over £400. So, what are you getting with a « Neve-style » preamp in that price range versus a modern, clean interface like a Focusrite?
Often, the « Neve-style » budget options are compromises that don’t quite capture the magic. As one engineer noted, many modern preamps inspired by Neve lack the key component that gives the original its character. They might be clean and functional, but they don’t deliver that specific vintage vibe.
The new ISA preamps don’t have an output transformer, and therefore lacking that weight to the signal that Neve preamps have. Plus, you couldn’t get the new ISA’s to break up the way a Neve can if you tried. Totally clean until you clip. Not a ‘Neve Style’ at all.
– Professional audio engineer discussion, Is the Focusrite ISA One a ‘neve-style’ preamp?
This is where modern design shines. Instead of a flawed imitation, companies like Focusrite offer reliability and versatility with clever features that emulate vintage character in a controlled way. This provides significant workflow benefits over temperamental vintage gear.
Case Study: Focusrite Clarett’s « Air » Feature
Focusrite’s « Air » mode is a perfect example of a modern solution. It’s an all-analogue circuitry that, with the press of a button, switches the preamp’s impedance and adds a high-frequency boost. This is modelled on their classic ISA preamps, which were themselves designed by Rupert Neve. The circuit loads the microphone in a similar way to a vintage transformer-based design, adding brightness and presence without the noise, maintenance, or cost of vintage gear. It gives you the option of a « vintage-inspired » character on top of an ultra-clean, reliable modern preamp.
So for a £400 budget, the answer is clear: you will get far better and more consistent results from a high-quality modern interface like a Focusrite Clarett than from a questionable « Neve-style » clone. You get a reliable, clean foundation with the *option* of colour, which is a much smarter investment for a project studio.
The Gear Pairing That Wastes 70% of Your Equipment’s Potential
Beyond the grand struggle with acoustics, there are two common gear pairings that silently sabotage your sound. The first is a simple but devastating technical mistake: incorrect gain staging. Specifically, connecting a piece of outboard gear with a line-level output (like a synth or an external preamp) into the microphone input of your interface. This is like trying to force a river through a garden hose.
The mic input is designed for very quiet signals and applies a huge amount of gain. Hitting it with a powerful line-level signal overloads the interface’s preamp instantly, creating harsh distortion that sounds terrible and is impossible to remove later. As Sweetwater’s technical team points out, this is a frequent error for those new to outboard gear. The correct way is to use the dedicated « Line In » on your interface, which bypasses the mic preamp and preserves the integrity of your sound.
The second, and far more common, wasteful pairing is this: expensive studio monitors in an untreated room. This is the single biggest waste of money in home audio. You’ve spent £500, £1000, or more on monitors engineered for a flat, accurate frequency response, only to place them in an acoustic environment filled with reflective surfaces, echoes, and standing waves. The room completely warps what you’re hearing. The bass might be boomy in one spot and non-existent in another. The stereo image becomes a vague smear. You end up making poor mix decisions because you’re compensating for your room’s flaws, not your audio’s.
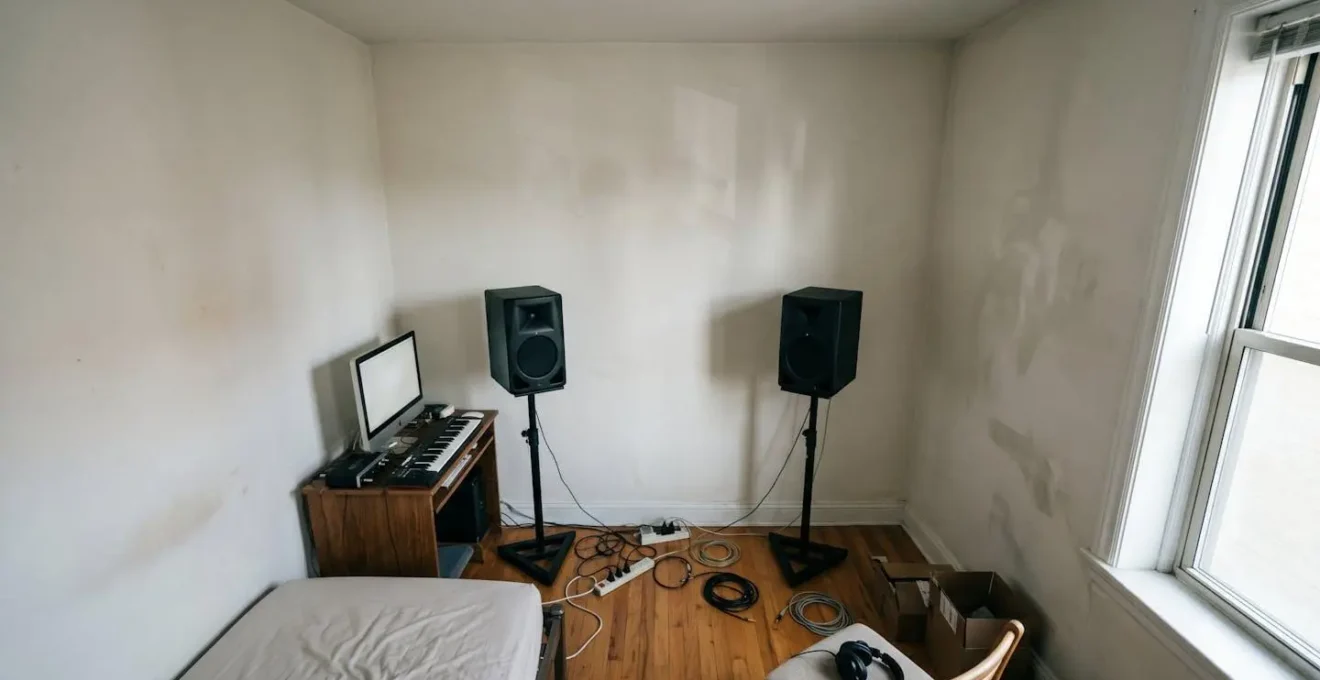
The image above isn’t an exaggeration; it’s the reality for countless home studios. The combination of parallel, reflective walls and high-quality monitors is a recipe for an inaccurate, frustrating mixing experience. Fixing the room (as discussed in H2.2) is the only way to unlock the true potential of the monitors you’ve already paid for.
When in the Year Should You Buy Studio Gear to Get 30% Better Deals?
Being a budget-aware musician in the UK isn’t just about what you buy, but *when* you buy it. The music retail calendar has predictable peaks and troughs, and timing your purchases can genuinely save you hundreds of pounds, freeing up cash for essentials like acoustic treatment. Forget impulse buying; a strategic approach pays dividends.
The most obvious sale is Black Friday in November, but it’s not always the best. Retailers know everyone is looking, and deals can sometimes be less impressive than they appear. The truly savvy buyer tracks gear throughout the year, ready to pounce during less-hyped but often more fruitful periods. For instance, the second-hand market on sites like eBay and Reverb becomes a goldmine in late January and February. This is when the « Resolution-Quitter » effect kicks in—people who received gear for Christmas or made a New Year’s resolution to start producing music give up and sell their barely-used equipment at a significant discount.
Similarly, understanding the industry’s own calendar helps. The NAMM trade show, where new products are announced, happens in January and again in the summer. Retailers often clear out old stock in the weeks following these events to make way for new models. March is also a key month, as it marks the end-of-financial-year for many UK businesses, prompting inventory-clearing sales. Here is a strategic calendar for your gear acquisition:
- January-February: Hunt for ‘Resolution-Quitter’ deals on second-hand marketplaces like eBay and Reverb.
- March: Keep an eye out for end-of-financial-year sales from major UK retailers clearing out old inventory.
- February & July: Monitor for post-NAMM stock clearances as shops make room for newly announced products.
- November: Track Black Friday deals, but always compare prices against previous months to ensure it’s a genuine bargain.
- Year-Round: Set up alerts on second-hand marketplaces for specific items to catch underpriced gear the moment it’s listed.
When Should You Buy Vintage Gear for Best Value in the UK Market?
Buying vintage gear is less about finding a « deal » and more about making a conscious investment in a specific sonic character. It’s not a starting point. You should only consider vintage equipment once your studio fundamentals—acoustics and monitoring—are rock solid, and you can clearly identify a specific colour or texture that your modern, clean gear can’t provide. Vintage gear often has a « sound of its own, » thanks to components like transformers that were common in older designs.
As explained by technical publications, these components are what impart the sought-after « vibe. » This is what you’re paying for: a piece of equipment that is not transparent, but rather a creative tool in its own right.
High performance, specialty pre-amps start at around $700, and choices multiply amazingly as you get to $1,000 per channel. Mic pre-amps with transformers tend to have more of a sound of their own.
– RibbonMics.com technical publication, Ribbon Microphones and their Mic Preamps
In the UK market, this translates to a significant investment. As industry discussions indicate, high-performance specialty preamps start at around £700, with choices expanding rapidly as you approach the £1,000+ per channel mark. The « best value, » therefore, isn’t about the lowest price. It’s about paying for a piece of gear that will see constant use and define your sound. The best time to buy is when a project demands a specific sound that only a certain piece of vintage iron can deliver, and you have the budget to acquire a well-maintained unit from a reputable seller. Rushing into a vintage purchase because of its mystique is a fast track to an expensive, noisy, and unreliable paperweight.
Which Interface Features Should You Buy for Today Versus Future Needs?
When choosing an audio interface, it’s easy to get mesmerized by high channel counts or flashy onboard DSP. However, the most critical feature to consider for future-proofing your studio is often the most overlooked: the quality and amount of gain available on the microphone preamps. This single specification can determine what kind of microphones you’ll be able to use effectively in the future.
Most entry-level and mid-range interfaces provide between 45 and 65 dB of gain. This is perfectly adequate for most condenser microphones, which have a relatively hot output. But what happens in a year when you want to record a softly-picked acoustic guitar or a delicate vocal with a low-output dynamic mic like a Shure SM7B, or even a passive ribbon microphone? Suddenly, your interface runs out of steam. You have to crank the preamp to its maximum, introducing noise and hiss into your recording.
As professional recording experience shows, quiet acoustic guitar recordings require 70 dB or more of clean, quiet gain. This is a level of performance that many standard interfaces simply cannot deliver. As AEA, a premier ribbon microphone manufacturer, points out, specially designed preamps are needed to get the best from these types of mics.
Most modern preamps provide only 45 to 65 dB of gain, which is not enough for a passive ribbon. Our top of the line preamps provide 81dB and higher gain level, which is a benefit of specially designed higher impedance preamps.
– AEA Ribbon Microphones technical documentation, How Impedance Can Change The Sound of Your Ribbon Microphone
Therefore, when buying an interface, don’t just look at the number of inputs. Look at the maximum gain specification. Investing in an interface with 70 dB or more of clean, quiet gain is one of the smartest future-proofing decisions you can make. It opens the door to a much wider palette of microphones and recording techniques down the line, saving you from having to buy an additional « mic activator » or a whole new interface when your creative ambitions grow.
Key Takeaways
- High-end equipment acts as a ‘magnifying glass’, exposing underlying flaws in your signal chain and room acoustics.
- Your room is the biggest bottleneck; treating it is the highest value-for-money upgrade you can make to improve your sound.
- A balanced system, where all components are of a similar quality level, will always outperform a system with one expensive ‘hero’ part and multiple weak links.
Why Does Your Recording Sound Different When You Change Audio Interfaces?
At a fundamental level, your recording sounds different because the preamps in the new interface are built differently. A preamp is not a simple amplifier; its sound is determined by the sum of all the components in the signal path. This includes everything from transistors and vacuum tubes to transformers, capacitors, and even the wiring. While the main goal is to amplify a signal, the subtle « coloration » from this combination of parts is what gives each preamp its unique sonic signature.
This leads to two main design philosophies in the audio world: « colour » and « transparency. » Vintage gear from the 60s and 70s, constrained by the technology of the time, inherently has a sound of its own. It’s often a very pleasing sound, but it’s not a purely accurate representation of the source. On the other hand, many legendary designers like Rupert Neve were, in fact, striving for the opposite: perfect transparency. They wanted equipment that would faithfully capture the performance without adding or subtracting anything.
Design Philosophy: Character vs. Transparency
Modern designers have largely achieved this goal of transparency. Interfaces from brands like RME are revered for being incredibly clean and accurate. They are versatile tools that can be used on any sound source without imparting an obvious character. This makes them excellent long-term investments for a project studio. You start with a perfectly clean canvas. If you want « colour, » you can add it later with plugins or a single channel of a « character » outboard preamp. It’s much harder to remove unwanted colour from an interface that « bakes it in » on every recording.
So when you switch interfaces, you are switching from one designer’s philosophy and component choices to another’s. One might be warmer and thicker, another brighter and more detailed, and a third might be almost perfectly neutral. The key to building a powerful and flexible studio is to start with a clean, transparent core (your interface) and then strategically add specific colours as needed. This puts you, the artist, in control of the sound, not the gear.
The next logical step is to stop guessing and start measuring. Take stock of your entire system, from the power outlet to your ears. Identify your single biggest bottleneck and focus all your energy and budget on fixing that one thing before moving on.