The frustrating truth is that adding more microphones often degrades your sound because you’re fighting the physics of your room, not because your gear is cheap.
- Every extra microphone adds out-of-time « bleed, » which cancels frequencies and creates a thin, muddy sound—a phenomenon known as comb filtering.
- Moving a microphone by just a few centimetres has a greater impact on tone than upgrading from a £100 mic to a £500 one.
Recommendation: Stop trying to achieve perfect isolation. Instead, give every microphone a specific sonic job and focus on capturing a cohesive performance within the room’s natural acoustic reality.
You’ve finally expanded your home studio. The new 16-channel audio interface is racked, the microphone collection has grown, and you’re ready to create those huge, layered, professional-sounding productions you hear on commercial releases. You meticulously place a mic on every drum, double-track the guitars, and layer the vocals. But when you press play, the result is a crushing disappointment. Instead of sounding big and powerful, your recording sounds thin, washed-out, and strangely smaller than your simple two-mic demo recordings. You’ve added more, but ended up with less.
The common advice is to blame your tools (« you need better preamps ») or to reach for complex plugins (« just use a phase alignment tool »). This is a wild goose chase. The problem isn’t your gear and the solution isn’t found by « fixing it in the mix. » The issue is more fundamental: you’ve started treating recording as a process of capturing isolated sounds rather than a cohesive performance. Every microphone you add doesn’t just hear its intended source; it hears every other sound in the room, just a few milliseconds later. This collection of slightly delayed copies is the real culprit.
But what if the key wasn’t to fight this acoustic reality with more isolation and more plugins, but to embrace it? What if the secret to a great multitrack recording was to make deliberate, intentional decisions about how these sounds interact? This guide will break down the fundamental principles that are far more important than the price tag on your microphone. We will explore why adding mics can thin your sound, how to plan a session with purpose, and why a few centimetres of movement can be more powerful than a new piece of gear.
By the end of this article, you will understand the core concepts that separate amateur recordings from professional ones. The following sections are designed to troubleshoot common issues and provide a clear framework for making better recording decisions from the ground up.
Contents: How to Achieve Professional Multitrack Sound
- Why Does Adding More Microphones Make Your Drum Recording Sound Thinner?
- How to Plan a 16-Track Recording Session Without Wasting Half Your Mics?
- Close Mics or Room Sound: Which Approach Captures the Performance Better?
- The Multitrack Editing Mistake That Kills the Feel of Your Best Takes
- Should You Record Drums, Bass or Guide Vocals First for the Best Results?
- Why Does Moving Your Mic 10cm Change the Sound More Than Buying a Better One?
- How to Set Your Buffer So You Can Record Without Hearing Delay?
- Why Does Your £500 Microphone Sound Amateur While Bedroom Producers Get Radio-Ready Results With £100 Mics?
Why Does Adding More Microphones Make Your Drum Recording Sound Thinner?
The primary reason your multi-mic’d drum kit sounds thin is a physical phenomenon called phase cancellation. When a sound wave from a single source (like a snare drum) arrives at two different microphones at slightly different times, their waveforms can move out of alignment. If the peak of one wave aligns with the trough of another, they cancel each other out, completely silencing a specific frequency. More commonly, you get partial cancellation across multiple frequencies, a process known as comb filtering, which carves out chunks of your tone and creates that hollow, weak sound.
Now, consider a drum kit. Your overhead mics might be 1.5 metres from the snare, while the snare mic is 5cm away. The sound reaches them at different times. But it gets worse. That snare mic also hears the hi-hat. The tom mics hear the cymbals. Every single microphone captures « bleed » from every other part of the kit. As detailed in a thorough analysis of microphone bleed, these timing differences can be up to 5-10 milliseconds. This cumulative bleed doesn’t add useful information; it creates dozens of slightly out-of-time copies of the entire kit, smearing the transients and building up a muddy mess in the low-mid frequencies.
This isn’t just a theoretical problem; it has a measurable impact. According to research on large ensemble recordings, this kind of destructive interference can cause an average reduction in transient intelligibility of 12.4 dB. In simple terms, the « punch » and « snap » of your drums are literally being erased by the interaction between your own microphones. This is why a simple two-mic setup often sounds more cohesive and powerful: there are far fewer opportunities for these destructive phase relationships to occur.
How to Plan a 16-Track Recording Session Without Wasting Half Your Mics?
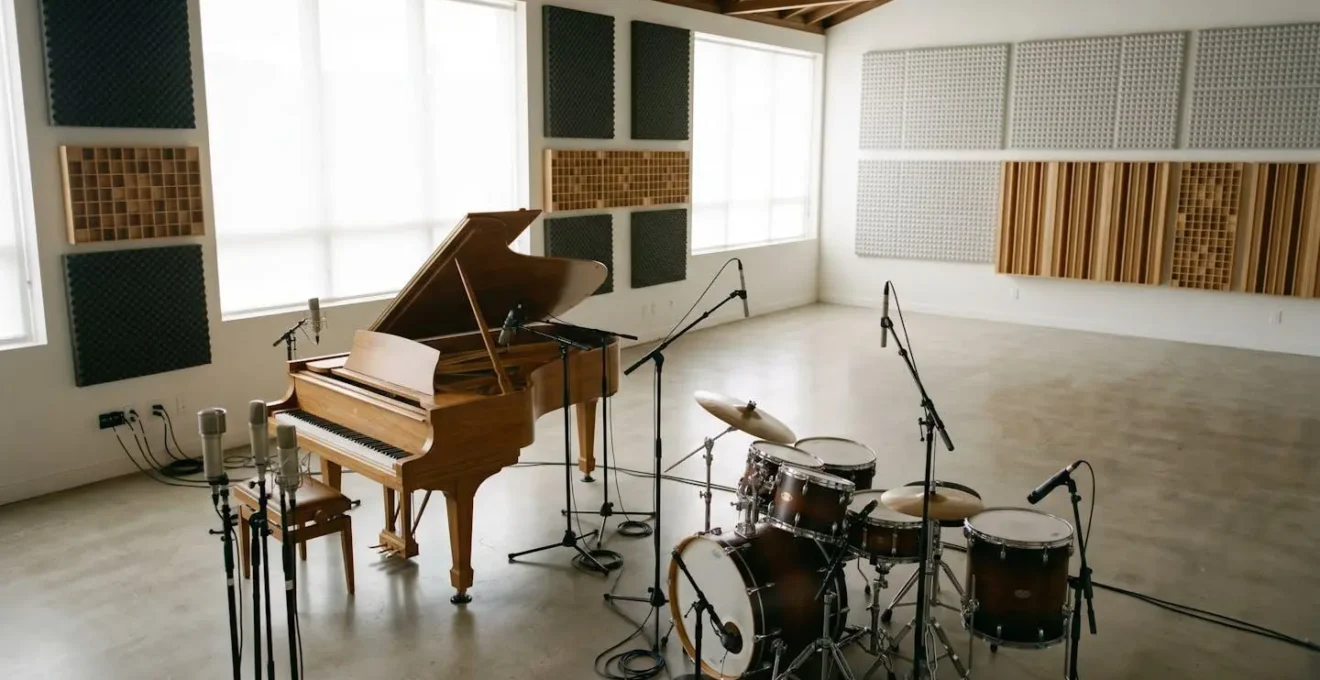
The solution to phase cancellation and cumulative bleed isn’t to stop using multiple microphones; it’s to start using them with clear intention. A successful multitrack session is planned before a single mic stand is unfolded. The goal is to move from a mindset of « capturing everything » to « capturing the right things. » Instead of just pointing a mic at every sound source, you must define a unique sonic job for each one. This proactive approach ensures every channel contributes constructively to the final sound, rather than destructively interfering with its neighbours.
This means thinking about the big picture. Will the two microphones on a guitar cabinet be blended into one cohesive tone during recording, or are you just creating two options to decide between later? Are the drum mics intended to capture isolated hits, or are they working together to build a complete picture of the kit? Planning around logical subgroups, like treating the entire drum kit or a group of backing vocalists as a single instrument, helps enforce this discipline. The illustration below captures this sense of deliberate, careful decision-making.
This focused approach is the difference between a collection of 16 disparate tracks and a single, cohesive 16-track recording. It forces you to make critical creative decisions during the recording phase, where they have the most impact, rather than deferring them to the mix phase, where you are merely problem-solving. A structured workflow is essential to putting this philosophy into practice.
Action Plan: Strategic Microphone Placement
- Define Sonic Roles: Before placement, assign a unique job for each microphone (e.g., ‘kick beater attack’ vs. ‘kick low-end resonance’, not just ‘mic the kick’).
- Plan in Subgroups: Think about which tracks will be treated as a single entity in the mix (e.g., all drum mics, stereo-miced piano, a backing vocal trio) and plan their miking as a cohesive system.
- Commit to Tones: Use multiple mics to create one intentional, blended sound during recording (e.g., combining a dynamic and a ribbon on a guitar amp). Don’t just set up two mics to have « options » later.
- Apply the 3:1 Rule: To minimize phase issues between mics, place the second microphone at least three times farther from the first mic than the first mic is from the sound source.
- Test Phase Relationships: Before hitting record, listen to your combined mics in mono. Flip the polarity (phase) switch on individual channels and listen for which setting provides the fullest, most solid low-end.
Close Mics or Room Sound: Which Approach Captures the Performance Better?
One of the most critical decisions in your plan is microphone distance. The instinct in a home studio, often a small, acoustically untreated bedroom, is to place microphones as close as possible to the source. The logic seems sound: maximize the direct sound and minimize the « bad » room sound. However, this approach often creates more problems than it solves. It exaggerates the proximity effect—an artificial bass boost that occurs when directional mics are very close to a source—and captures a sterile, unnatural sound that lacks depth and context.
A more natural and often more effective approach is to pull the microphone back slightly. As the team at Pandaqi Audio notes in their recording tutorials:
We hear all sound from a distance. Recording it that way leads to a more natural and usable result. About 10-30 cm is often a sweet spot. Except for percussive elements. Those can and often should be close-mic’d.
– Pandaqi Audio Recording Tutorial, Microphone Placement Guide
This small amount of distance allows the sound to develop and lets the microphone capture a more balanced tonal picture. This is especially true for vocals. A study of vocal recording techniques by DPA Microphones found that while recording at 4 inches provides intimacy, it often requires heavy de-essing. In contrast, moving the mic back to 12 inches and angling it towards the chest captures more warmth and natural room timbre, creating a sound that draws the listener in. The key is to decide which you are trying to capture: an isolated, dry source that you will process heavily later, or a more complete, natural performance that already has a sense of space.
The Multitrack Editing Mistake That Kills the Feel of Your Best Takes
Your philosophy of capturing a cohesive performance must extend into the editing phase. The most common and destructive editing mistake is to work on tracks in solo. When you quantize a single drum track or « tune » a single vocal harmony in isolation, you are breaking the fragile phase and timing relationships you worked so hard to capture. A drummer’s feel comes from the minute push-and-pull between the kick, snare, and hi-hats. « Correcting » the snare to a perfect grid in solo might make that one track technically perfect, but it will sound robotic and disconnected when played with the rest of the kit.
The same principle applies to bleed. If you edit a section of the lead vocal track, you must apply the exact same edits (cuts, fades, time-stretches) to any other track that has significant vocal bleed, such as the acoustic guitar or drum overheads. Failing to do so creates new, jarring phase problems that weren’t present in the original performance. This is why editing multitrack drums is often done with all drum tracks grouped together, so an edit on one is an edit on all.
Ultimately, the goal of editing should be to enhance the performance, not to erase its humanity. When you are « comping » (compiling the best bits from multiple takes), prioritise the emotional arc and energy over flawless technical execution. A slightly flat note in a chorus delivered with incredible power is almost always better than a perfectly pitched note sung with no conviction. Preserving the feel is paramount.
- Never quantize or edit tracks in solo; always work with the core rhythmic and melodic elements playing to preserve natural interaction.
- Apply identical edits to all tracks with significant bleed from the edited source to maintain phase coherency.
- When comping takes, prioritize the emotional arc and performance intensity over perfect pitch or timing.
- Constantly check your edits in mono. Phase problems created during editing will become immediately audible as volume drops or strange tonal shifts.
Should You Record Drums, Bass or Guide Vocals First for the Best Results?
The question of which instrument to record first is another strategic decision with no single « correct » answer. The right choice depends entirely on the song’s foundation. Is the song built on a precise, driving rhythm, or does it flow from an expressive, emotional vocal performance? Defining the « anchor » of the song dictates your starting point and sets the tone for the entire production.
For rhythm-centric genres like funk, hip-hop, or rock, starting with the rhythm section (drums and bass, often recorded together to a click track) is essential. This locks in the groove and provides a solid, unwavering foundation upon which all other layers can be built. Conversely, for a singer-songwriter ballad or a folk tune, the most important element is the human feel of the lead vocal and its accompanying instrument (guitar or piano). In this case, starting with a guide vocal and chordal instrument captures the natural ebb and flow of the performance, and the rhythm section is later built around that emotional core.
Choosing the wrong starting point can create significant problems. Trying to force a rigid drum grid onto a deeply emotive vocal performance can strip it of its life, while trying to build a tight funk track around a rhythmically loose guide vocal is a recipe for frustration. The table below outlines common strategies to help you choose the right foundation for your song.
| Foundation Type | Start With | Best For Genres | Key Advantage | Risk If Wrong Choice |
|---|---|---|---|---|
| Rhythmic Foundation | Drums + Bass + Click | Funk, Hip-Hop, Rock, Dance | Locks in groove and tempo precision for layering | Band feels disconnected from rigid tempo map |
| Emotional Core | Guide Vocal + Guitar/Piano | Singer-Songwriter, Folk, Ballads, Jazz | Captures natural tempo ebb and flow with human feel | Difficulty building arrangement around undefined rhythm |
| Instrumental Anchor | Featured Riff/Groove Element First | Blues, Guitar-driven Rock, Instrumental | Defines song identity; other parts built around this | Other instruments struggle to match specific phrasing |
| Ensemble Performance | All Together Live (Minimal Separation) | Jazz, Classical, Live-feel Rock | Maximum energy and musical interaction preserved | Limited post-production flexibility due to bleed |
Why Does Moving Your Mic 10cm Change the Sound More Than Buying a Better One?
The most powerful EQ you own is not a plugin; it’s your hands. The position of a microphone relative to the sound source has a dramatic and immediate effect on the captured tone, far more so than the subtle differences between microphones of a similar type. This is because tiny changes in distance and angle fundamentally alter which frequencies are emphasised or reduced, due to complex acoustic phenomena like the proximity effect and the way sound radiates from an instrument.
Think of an acoustic guitar. The sound coming from the soundhole is bass-heavy and boomy. The sound from the 12th fret is bright and articulate. The sound from near the bridge is thin and stringy. Moving your microphone just a few centimetres between these points acts as a powerful, natural equalizer. Pointing it directly at the source (on-axis) will be brighter than pointing it at a 45-degree angle (off-axis). There is no « correct » spot; there are only different tonal options. The engineer’s job is to find the « sweet spot » that best serves the song.
This principle is the reason why an experienced engineer with a £100 dynamic mic can achieve a better sound than a beginner with a £500 condenser mic. The experienced engineer understands that mic placement is the art, and the microphone is just the tool. They will spend five minutes moving the microphone to find the perfect tone before ever thinking about reaching for an EQ plugin. This hands-on, experimental approach is the fastest path to improving your recordings.
How to Set Your Buffer So You Can Record Without Hearing Delay?
There’s nothing more distracting during a performance than hearing your own voice or instrument delayed in your headphones. This delay, known as latency, is caused by the time it takes for your computer to process the audio. The setting that controls this is the buffer size in your Digital Audio Workstation (DAW). A smaller buffer size results in lower latency, but puts more strain on your computer’s CPU. A larger buffer size reduces the CPU load, but increases the delay.
The key is finding the right balance for the task at hand. The human brain can start to perceive delay at around 10-12 milliseconds, although industry research on latency perception shows that trained professionals can often detect it at just 5-6ms. When recording, you need the lowest possible buffer size your computer can handle without producing clicks, pops, or glitches. A setting of 128 or 256 samples is often the sweet spot, keeping latency below the threshold of perception.
Once you are done recording and have moved on to mixing, where you will be using many more plugins, latency is no longer a concern. At this stage, you should increase your buffer size to 512, 1024, or even higher. This gives your computer the processing headroom it needs to run complex plugin chains without crashing. The workflow is simple: low buffer for recording, high buffer for mixing. The following table, based on data for a 48kHz sample rate, provides a practical guide.
| Buffer Size (samples) | Use Case | Latency at 48kHz | CPU Load | Stability |
|---|---|---|---|---|
| 32-64 | Live performance with virtual instruments | 0.7-1.3ms | Very High | Prone to glitches |
| 128 | Recording vocals and instruments with monitoring | 2.7ms | High | Moderate |
| 256 | Recommended recording sweet spot | 5.3ms | Moderate | Good |
| 512 | Mixing with moderate plugin count | 10.7ms | Low | Very Good |
| 1024-2048 | Mixing/mastering with heavy plugin chains | 21-43ms | Very Low | Excellent |
Key Takeaways
- The primary cause of thin, weak multitrack recordings is phase cancellation from microphone bleed, not poor quality gear.
- Effective multitrack recording is about intentional planning: assigning a specific « sonic job » to every microphone and making decisions about tone during the recording phase.
- Microphone placement is your most powerful tool. Small adjustments in distance and angle have a far greater impact on sound than expensive equipment upgrades.
Why Does Your £500 Microphone Sound Amateur While Bedroom Producers Get Radio-Ready Results With £100 Mics?
The frustrating scenario of a bedroom producer with a cheap microphone achieving a better sound than you with your expensive gear is incredibly common. The reason is simple: they have mastered the fundamentals, while you may still be focused on the tools. A great recording is, and always has been, about capturing a great performance of a great sound at its source. No amount of expensive equipment can fix a poor source or a poorly captured one. As engineers from Shure have long stated:
It is a common view in the recording industry that the music played by a skilled musician with a quality instrument properly miked can be sent directly to the recorder with little or no modification. This simple approach can often sound better than an instrument that has been reshaped by a multitude of signal processing gear.
– Shure Application Engineers, Microphone Techniques for Recording Guide
This philosophy is proven time and again in practice. Technique consistently trumps technology. The bedroom producer getting radio-ready results knows where to place their one microphone to capture the most balanced and pleasing sound from their instrument, a skill developed through experimentation and critical listening, not by reading spec sheets.
Case Study: The Placement vs. Price Test
An experiment conducted by Home Studio Basics directly tested this theory. Multiple cardioid condenser microphones, ranging in price, were set up at identical positions to record an acoustic guitar. The test revealed that when proper placement was used—positioning the mic at a 45-degree angle pointing toward the 12th-14th fret from about 4-6 inches away—the results were consistently professional, regardless of the microphone’s cost. Conversely, when improper placement was used (e.g., too close to the soundhole or too far away), even the most expensive microphones produced a compromised sound, capturing either excessive low-end « mud » or a thin, lifeless tone.
The lesson is clear. Stop chasing the « perfect » microphone and start mastering the art of placement. The path to professional sound is not through your wallet, but through a deeper understanding of how to capture sound in a room. It’s about working with acoustic reality, making intentional choices, and prioritising the performance above all else.
Your next step is to stop reading and start doing. Take one microphone and one instrument, and spend an hour just moving the mic. Record 30-second clips with it 5cm away, then 15cm, then 30cm. Point it at different parts of the instrument. Listen back, take notes, and begin to build your own mental library of sounds. This is the work that will transform your recordings.